Bobbed hair in the 1920’s was not all about drastic crops. Many women happily held on to their locks and achieved 1920’s bob quite easily as Glamourdaze’s Tia Semer demonstrates.
1920’s Hairstyles Faux Bob Tutorial

This long 1920’s hair style is achieved by creating pin curls around the head. A pin curl is a section of hair that is rolled between the fingers and pinned flat to the scalp. If you want shorter looking hair for a 1920’s look but don’t want to cut your hair, this 1920’s hairstyle for long hair tutorial is a relatively simple, classy way of “shortening” your hair temporarily.
Step by Step 1920’s Faux Bob Hair
What you will need:
- Hot rollers, curling iron, or whatever your favorite method for getting curls.
- Bobby pins.
- Anti-frizz cream or serum.
- Hairspray (optional)
- A flapper-style headband.

1.Part your hair on the side. Brush through your hair to get rid of any tangles.

2. Curl your hair, using whatever method you like to use to get curls, but do curl your forelocks downward, away from the crown, to create some volume. I used hot rollers.

3. Once your hair is set, comb though your hair with your fingers. If needed, apply an anti-frizz cream or serum, focusing especially on the crown. Keep this handy and reapply as needed.

4. Begin on the side with the most hair. Section this off toward the back. Pin or clip the remainder of your hair out of the way while you work.

5. At the upper corner of your forehead, make an “X” with two bobby pins.

6. Gather a small section of your hair and begin your first pin curl. Depending on what side of your head you are working on and what best suits you, you can wrap your pin curl clockwise or counter-clockwise. Begin by taking a small section of hair; loop the ends around your thumb. Carefully slip this loop off your thumb and coil it toward the scalp by rolling it upward, using both hands. Don’t let go of it until you are ready to pin it.

Once you have the curl where you want it, hold it in place with one hand and pin it flat to your scalp. Try to keep your bobby pins hidden; insert bobby pins against the scalp, through the bottom layers of the curl. You will need about two to three pins per curl. Bring your first curl up to the bobby pin “X”.
Finishing Touches

7. Repeat step 6, pinning the curls side-by-side along the base of the scalp, until you’ve used up the hair on that side. You can make the edges of the curls slightly overlap, if you like.

8. Move to the other side of your hair; section this also toward the back.

9. Make a bobby pin “X” on this side, this time above the space next to your temple.

Repeat step 6 until this side is finished.
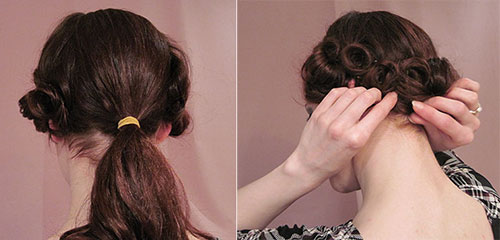
10. Now for the back–the hardest part! Tie this section back with a hair tie at the nape of your neck. It’s good to use a hair tie that is close to the color of your hair, if you can. Keep a mirror on hand, or have a friend help you. Start your pin curls away from the base of your ponytail and work your way in. Make sure your pin curls cover the hair tie.
11. You are done! You may use a light spritz of hairspray if you wish, but it isn’t necessary.

12. Add a flapper headband for a 1920’s flapper look and you’re done !
That’s all !
© Tia Semer Glamourdaze

Tia creates her own handmade eco friendly vintage cosmetics and perfumes. Check out Eliza Cosmetics.
Flapper Lips – Quick 1920’s Makeup Tutorial

1920’s Lipstick by Besame Cosmetics
