7 Steps to a 1960s Mad Men Makeover –

Top Hollywood make-up artist Eddie Senz, from the 1930s to the late 1960s helped make-up a host of glamorous stars from Marlene Dietrich to Elizabeth Taylor . His early beauty tutorials published in Mademouselle in 1935 are among the first of their kind. He shares his genius with Family Circle in 1963.
“Every woman should try to look her prettiest. The ancients discovered the the ideal face was ‘oval’. It amazes me how many women forget this basic principle when applying makeup and choosing her hairstyle.”

1960’s Makeup Kit and Color Palette.
STEP 1 -THE OVAL ILLUSION.

Start by analyzing your face to find out how to create a pleasing outline, or structure, and to minimize any fault that you may have via your hairstyle or cut.
Then make use of your hairstyle to create the oval illusion you want. Once you have made this basic change in ‘outline’, the shape of brows and mouth help balance the face.
Whatever hair design you choose should always help the face appear more ‘oval’ – the hairdo can correct a faulty nose, a wide or narrow chin, a broad or thin face shape. Width in the hair can make a face area seem narrower by contrast; with hair flare or height you can compensate for breadth or length of parts of the face. neckline and jewelry, to, help create the ‘oval illusion’
STEP 2 – FOUNDATION.

In make-up, it is always wise to underdo. Begin with a clean face and apply thin dots of foundation – cream or liquid – evenly over the face and throat, including lips and eyelids. Keep the coating extremely thin in the area under the eyes; do not try to cover shadows completely; heavy makeup in the eye area can give you a crepy look. Let the foundation set and then remove the excess with tissue. The foundation gives color to the skin !
Choose a shade close to your own natural shade ( or one shade darker) and, to enliven the skin or to give a glow to sallow skin, one a with a slightly rosy tint.
STEP 3 – EYE SHADOW.

For a subtle effect, pat with the tip of the index finger. To avoid unbecoming smudges on the sides of the nose between the eyes, gently stretch the skin away from the nose with fingers of one hand and pat the shadow on, with a finger of the other hand. Starting at the inside lid to the fold, pat the shadow over the ball of the eye.

At the outer tip of the eye, fan the shadow outward and upward to the eye bone, extending the upward curve of the lower lid toward the tip of the brow.
This way of ‘shadowing’ gives real depth, oval shape to the eye area, and illusion of width to the eye.
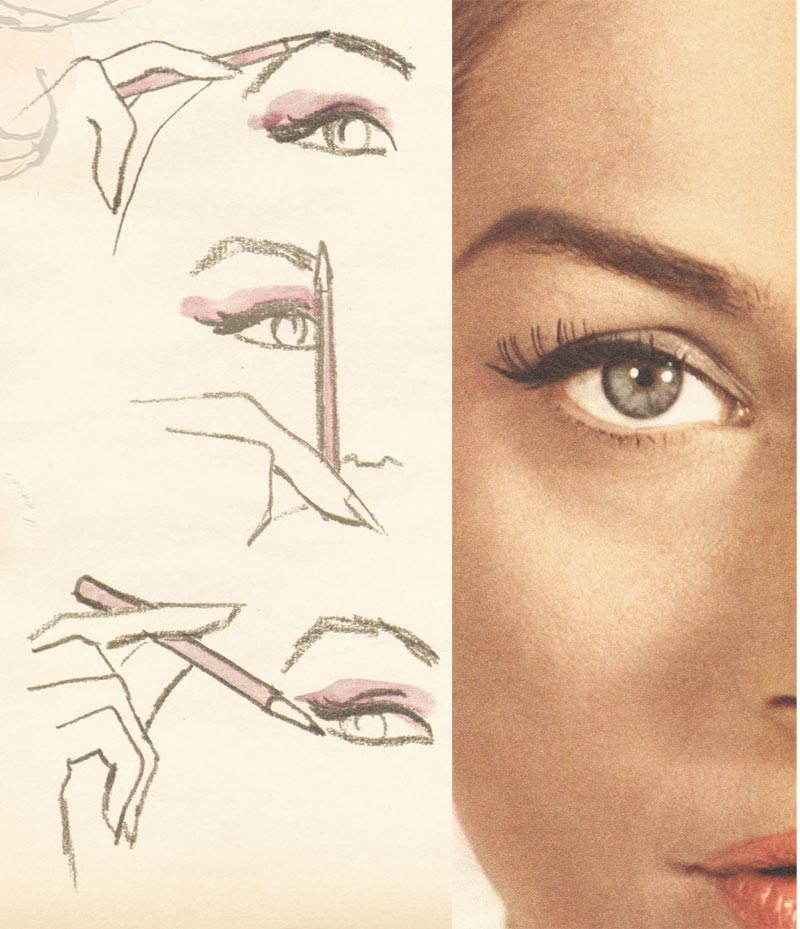
STEP 4 – EYE BROWS.

Brush the brows upward and outward to give then their fullest effect and to define the natural arch. Then, with brow pencil, fill the brows as needed. A good rule is to remove hairs ‘below’ the arch and to pencil ‘above’ the natural brow line. The inner tip of the brow should be directly above the inner tip of the eye. ( Pluck stray hairs over the bridge of the nose.)

The arch, or highest part of the brow, should be toward the outer part of the face – directly above the outer rim of the iris ( the colored part of the eye) when you are looking straight ahead. The start of the brow should be lightly penciled and should be kept fairly thick. Keep this thickness over the length of the brow to the arch and taper the width only at the outer tip of the brow.

The outer tip of the brow should be on a level with the inner tip ( do not bring it further down!) and should flare outward. This raising and thickening of the brow, with the outward flare of the tip, makes the orbit of the eye appear large and gives the eye that all important ‘oval’ shape. Two brow pencils – here a brown and a gray – give a natural look. Use light feathery strokes to draw the fine hair-like lines that will make a soft eye framing brow outline.
STEP 5 – MOUTH.

The mouth is first lined; use a brush to give fullness and contour. The lip brush should be saturated with color, for lips go on better as color collects in the brush.

Start with the upper lip, lining it from the middle to tip on one side and then from middle to tip on the other. The make the upper lip fuller and the whole mouth more generous, shape the upper lip so that it is as full as the lower lip. Do this by lifting the outline at the middle of the upper lip so that the dip is shallower than is natural.

Extend the color at the tips of the upper lip beyond the natural corner, keeping the line above and a little wider than the tip of the mouth. Next line and fill the lower lip, bringing the outer tip upward and outward in the direction of its natural curve to meet the upper lip outline. Then blot so that a full imprint of the entire mouth appears on the tissue.
STEP 6 – SHADING.

You can use dark foundation to reshape the face. This effect is achieved through cutting light reflection on areas where the shading is applied. To make the face appear slimmer, use shading toward the outside of the face. Be sure to blend the shading well into the foundation in the area where they meet so there is no visible change. If this area is carefully blended, shading can be quite dark toward the outside of the cheek or forehead. You may also shade under the jaw.
STEP 7 – EYE LINER.

Again, stretch the eye skin away from the nose so the liner can be applied in an extremely fine line at the inner tip of the upper lid. Keep the line at the roots of the lashes to give an effect of lash thickness.

From a hairlike line at the inner tip of the eye, thicken the line slightly over the middle of the lid and a little more at the upper tip; extend the line slightly at the outer tip to widen the eye and lift the lash line slightly at the outer corner.
To line the eyes, use a fine brush and black or dark brown liquid liner or mascara. While liner is still moist, blend it lightly with the tip of a finger to soften the line; take care not to smudge. Now once again – take a fresh look at your eyebrows – one more gentle sweep with your pencil, one quick alignment to see everything is symmetrical, and you’re ready to stop the traffic!
See also Eddie Senz – 12 Steps to a Hollywood 1940s Makeover